Saturday, January 31, 2009

How to- getting started

I have been asked by many of my new stampers where they should start and my seasoned stampers where I get and do with my ideas- so I thought I would start a How to Series - what would be needed- how to do some basic and advanced techniques- some ideas on how to get beyond what you see. I hope this is helpful to you- please leave me comments on any questions you have about anything I do here or techniques you want to see or questions you have about anything and everything and if I can, I will try to address it on the blog itself-

The basics: My go to tools- things I cannot live without
  1. Cutter/Scorer- you need this to cut and score paper- I have the SU fiskars
  2. Paper- basics- either whisper white or very vanilla; colorcardstock- choose a pack from one of the color families tthat appeal to you as you know they will coordinate (I have tried many different companies and SU stands up to the test every time- I do not skimp on my paper!)
  3. Glue- I cannot do without my Tombow double stick tape for most of my paper to paper adhesions; but it is also nice to have Sticky strip for any heavy duty taping (such as boxes or 3 D items you want to hold up to repeated manipulations); Dimensionals- for so little adds so much dimension to your project; Tombo Multipurpose Adhesive for gluing on beads or any 3 D item; Glue Dots for adhering buttons and other items that really need to stick
  4. Inkpad- this depends on what kind of stamps appeal to you: either way I cannot do without my Versamark pad- for embossing, popping pastel technique, resist, emboss resist and it makes a watermark on any colored cardstock so this is an easy way to make subtle background on any carstock without having to invest in gazillion colored pads. Basic Black Pad- for outline stamps and for stamping sentiments- absolute necessity.
  5. Scissors- a good pair to cut ribbon or cut out stamped images
  6. Stamps- Usually one sentiment set that has lots of versatile sayings and an image set:

If you are someone who is drawn to outline stamps then you will also need something to add color to the images- options include markers, inkpads, watercolor pencils, watercolor crayons, pastels to name a few- and depending on what you choose the tools to use it- such as aqua painter or blender pen. Right now I am gaga over the watercolor crayons.

If you find solid image stamps that appeal to you then you should consider some color pads- full size or stampin' spots- these are an easy way to try some on for size- markers although coloring in an entire image with markers can be tedious if it is large- or pastels with blender pen or watercolor crayons with spritz method to get that watercolor look, or versamark with sponge or daubers- sponges are very useful for antiquing the edges too- I have one sponge I cut into quarters and use the edges for different color families.


Everything else is just frosting on the cake- My upline Tami did this experiment on one of our get togethers where she gave people 3 sheets of CS and 3 photos and told us to create a scrapbook page in 15 minutes- we were all looking at each other and saying this is it? but when push came to shove we created some amazing pages that looked totally different from each others and taught us that you don't need a whole lot of stuff to make cards or scrapbook pages- just some noggin! When you have limited supplies I think you HAVE to be creative and in these economic times that is a good thing to remember. and because you will NEVER have as many tools as you think you need......or want.


Here are some examples using just the basic items discussed above:

Outline stamp colored with watercolor crayon using aqua painter- one color cardstock with scoremarks made with scorer.


These are made using solid image using different techniques- this is made with versamark pad with pastels and daubers technique called popping pastels.


This is just straight stampingpad using one tangerine and one kiwi pad along with the black. I snipped the corners with the scissors to make the step corner.

This is using the watercolor crayons directly on the rubber then spritzing it with a fine mist then stamping it on paper. This is what I do with the empty bottles of Stampin' Mist. It is perfect for this technique.

Extras: Nice to have but not absolutely necessary-

  1. Designer paper- you can use one sheet and make it go really far by using it as an accent
  2. punches- basic would be nested circles or squares but I use my scallop circle ALL THE TIME!
  3. Dazzling diamonds glitter with 2 way glue pen- I think if I had to have just one embellishment this would be it- it adds so much to so many different cards for so little- I think I still have the same jar that I got from a couple of years ago! Any glitter adds so much to a card....
  4. Stampin' Wheels- you can do miles and miles of backgrounds easy peasy with these- I love my wheels but that's a personal obsession.
  5. Other embellishments- Ribbons, Buttons, Brads- metal, colored, jeweled, the options are endless, chipboard letters, images, clips, tags, punched, diecut, and now even crocheted flowers and other shapes, stickers, rub-ons, need I go on?
  6. Stamp cleaner and stampin' mist- I spent a lot of moollah on stamps so I want to keep them in good shape- wash them off with warm soapy water and dry, use lanolin and alcohol free baby wipes, or use the good stuff- stampin' mist has a conditioner that keeps your stamps nice and soft- FYI- keep them also out of the sun- you don't want your rubber to get hard and not stamp well anymore.

I hope this helps those of you who are getting started or re-evaluating what you need. Leave me any comments or suggestions, I love reading what you have to say!

Lynda


Wednesday, January 28, 2009

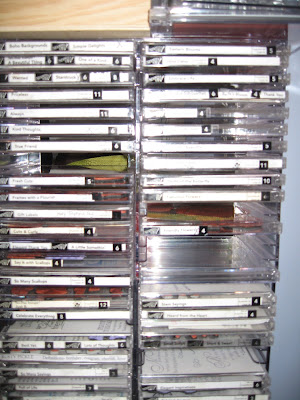
Stamp Storage- my solution

I have- I hate to admit- THOUSANDS of stamps- how to organize it all with all the things I still keep collecting becomes an issue- Space is always a premium so I have been unmounting for several years now and I have to tell you I LOVE it! However there has been several discussion forums on SCS and other sites re: safety of CD cases with clingmount which has been my choice for mounting my stamps- I am concerned that if unmounted in envelopes or bags that the image will get squished and distorted somehow- I've destroyed some stamps having them lay about and having something on top and having the imprint of something permanently imprinted on the rubber- not good- so I like the hard case of CD's. The thin clingmount will allow deeply etched stamps like SU to sit without the opposite side of the DC case touching the rubber. Thin clingmount from Harry at Rubberstamp Concepts offers the best deals on it if you buy bulk.

I cut a piece of paper with stamp images and insert it into what would be considered the "front". Inside the stamps are mounted onto the EZmount Stamp storage panels from Sunday International- again the best price I could find- 10 for $3.49 plus tax and shippping and on the back side I stick on the index images from the stampset. On the spine I stick the label on so so that the "front" in on the bottom so the stamps sit on the storage panels.


By doing it this way I can have a whole mess of stampsets close to me so that I don't have to get up in the middle of stamping to see what sets I have to fit what I am doing. Try stacking this many stamps in the regular boxes and you will have a tower that undoubtly will topple over regularly. I put a 1/4 inch strip of white paper that I am always cutting off to highlight the name of sets- my Christmas sets have a strip of red paper behind it so I can tell- Fall/ Halloween is orange- you get the idea.
Best acrylic handles to use with these? basically whatever you can afford. My favorite? Close to My Heart with grid vinyl attached for perfect placement each time.
I llike being able to see through my handle to place my stamps and even with rubber stamps this works really well.
Just my humble opinion.
Lynda

Tuesday, January 27, 2009

A simple note of thanks


So many people have been so kind to tell me that they like my cards- Am I that creative? not really. I am a big fan of CASE'ing -Copy and slightly Enhance, embellish or whatever you think it stands for. I do think that case'ing is a great form of flattery and I do it all the time. Take this simple little card- On the cover of Sale-a-bration catalogue there was a cute little card using one of their sentiments- which I don't have yet in different color scheme- so here is a slightly altered and simplified version using Petal Pizzazz. 3x3 textured so saffron CS with a strip of white CS with a note of thanks and flower stamped in red on white and celery stamped on celery leaf and stem. Really simple- you really could do this when your husband says I need a thank you card for this gift - as you are walking out the door to go to a party- It happens to me all the time!
Thanks for looking!
Lynda

Friday, January 23, 2009

Valentine favors

This is the favors I am making for my kids' Valentine treats for their classmates- again the no candy theme. This is a template I use often- I made one like this last year too for them. People have asked me what the dimensions are for this but depending on the size of the image you want to use and the treat you want to put in the spine, the dimensions change. So I will give you the how to depending on what you are using.

I try to be conscious of efficient paper use so the dimensions of these are all 8 1/2 by whatever height you want- here I am using 3 5/8 or so because that is about 1/3 of 11 so I get 3 pieces out of 1 sheet of cardstock.

The formula is that you take the width of whatever you want to put in the spine of the card and score 1/2 that width from the center of the card to the left and 1/2 that to the right and then the another full width to the right again.

The pencils are about 3/8 inch width so score at 4 1/16, 4 7/16, then at 4 13/16.


For the sweet tart treat and lip balm treat, it was about 1/2 inch so score at 4, 4 1/2, then at 5 or so.
The sweet tarts are a little skinner so you may have to tape the candy in but I don't want to confuse people with all these tiny score adjustmens.

This is what it looks like with the sweet tarts.


Here is a variation with a different color combo that I did for my class the other night with a lip balm in it.


This is what it looks like in the spine.


How to:
Stamp the image in black then watercolor crayon the image. The whisper white CS is 2 1/2x 3.


Score the cardstock depending on the item you are trying to give. Use the horizontal slot punch to make the holes. The top and bottom will be valley folded and the center mountain folded to hold the treat.


This is what it should look like with a pencil .

Finished product with image mounted on a pirouette pink CS 2 3/4 x 3 1/4" and edge trimmed with the scallop edge punch. I put a strip of pirouette pink on the back inside to show off the scallop more-see the first image- hard to see here though.
Happy heart day!
Lynda


Wednesday, January 21, 2009

My punch window sheet

I have a lot of punches- I have never met a punch I did not want to take home- although space is always the issue- and when one of my friends made a small ringed book with a punch on each card I thought it was a great idea until I tried to use it- I had to flip over bunch of different ones until I finally got to the one I wanted then if it did not fit, I had to flip over a bunch of other ones to find one that did- DROVE ME MAD!

You know about me and time!

so here is my little 2 cents worth punch template- I have 2 of these made from half sheet of cardstock- the middle ones had to be squeaked in by folding the paper some and getting it in the center- not that hard- then I laminated the whole thing - so the wrinkle from the folding doesn't even show.

Now I have this 2 little sheet that I just move around to see what fits the image I want- see the small tag with the bee? Just perfect!


Are the words too tall or not? Perfect! I keep these on my shelf and it takes up virtually no space and I keep grabbing for it all the time. Although now with the new punches coing out I think I am going to have to make a third one- oh well. The laminate keeps it clean and sturdy and this certainly is one of my favorite tools. Try it for yourself and see!
Lynda

Tuesday, January 20, 2009

Happy Inauguration Day!


I have a drug rep buddy whose wife is a sales person for salons in the bay area- I have many friends who spend many hundreds of dollars on beauty products and regimens every month- (and they certainly look great) and we joked that his wife would not like me very much as my beauty regimen consists of my $1o oil of olay that I buy at costco once a year. But I do love getting a pedicure - although with the economic times as they are, I probably get it done once or twice a year and making do on my own. But this weekend my little sister from New York was visiting and we decided to treat ourselves to a salon pedicure and what the heck I decided to hang it all out there for our new incoming president. I do not mean any disrespect by painting his name on my toenail- I am just celebrating a historical day in this country and hoping that there really will some changes in this country where unemployment has now hit the all time high in 14 years- with many people and families in desperate situations- fearful of losing homes adn health care. I am kind of hopeful and excited to see where Obama will lead us....... the poor man with all the world's weight and eyes on his shoulders......

Monday, January 19, 2009

A Happy Heart all glittered

I love this set- those sweet dandelions blowing little heart- how can you stand it?

The base card is pink pirouette 4 1/4 x 5 1/2 with a 1 1/4" strip of DD paper from Love you much bundle across the bottom. The image is stamped in ridinghood red onto distressed very vanilla CS and mounted on distressed riding hood red CS. The hearts are from Love you much set also and punched out with the heart to heart punch- the sentiment is from the happy heart that I separated from the dandelion -which I found more useful- onto

vanilla CS with choc chip ink and sponged edge with ridinghood red. It's all mounted using dimensionals. Then I glittered the dandelions using 2 way glue pen and dazzling diamonds- again- more pretty IRL than in photo- dang!

I am coming along cleaning my room and I am starting to see the bottom on some small corners of my room. This is my "hot corner".
I got that heatgun rest a long time ago and that square thing is a piece of corian that I picked up at a flea market for a song that is pretty heat resistant so I don't mess up my
cabinet. I use the hot knife to cut my clingmount after I unmounted all my stamps from wood -

although now I am using the plastic storage sheets to make sure my stamps are going to last if I store them in the CD cases.
One of my downlines were trying to sell off her powder pal but I hate all that sprinkling on then pouring it back in with a brush- you know me- no time to waste!so I have my embossing powders and glitter all labels in glad disposable containers in a stack- large enough to put an A2 card into and use those slurpy spoon straws -cut so that the handle is squished in the lid - as to not have it fall into the powders itself and I just scoop and pour it over the image and let it fall back into the container- no brushing anything off anything-

I don't know if you find this helpful but this system worked better, cheaper and cleaner than anyting else I tried.

Thanks for looking!

Lynda

Friday, January 16, 2009

Gingerbread house Challenge Goodies


Yesterday I received my goodies from Mercedes Weber from her Gingerbread House challenge entry-here: http://mercedesweber.blogspot.com/2009/01/gingerbread-house-contest-winner.html
and she sent me all these scrumtious goodies- A clear sentiment set from Melissa Frances, vintage rub-ons, a pack of overlays and stickers, a patterned paper pack, and a soft hued paper bundle and matching ribbons, and package of scallop cut cards and envelopes - It's so my style and colors I love.... It's Christmas all over again! Thanks Mercedes!

Thursday, January 15, 2009

After the Holiday Blues and my Holiday Card

I've been looking at some blogs where they have these beautiful basements or rooms with living rooms where they are designing their scrapbooking and stamping room from floor up and wonder when I can have something like that. When I lived in my other house I had a table and stuff under this bed and that and sometimes I would buy duplicates because I forgot I bought it and put it away some place. Now I have a study where I do my stamping and I have sworn to keep my things limited to this room but it seems no matter how much space or table I have I only seem to have 12x12 inch space to stamp- so as embarrassed as I am- here is the state of my stamping room. papers and fabrics piled up 2 feet deep with scraps of paper and albums and cards to embellish galore. So go ahead- laugh at me- no matter how bad your stamping space may be- now you can say- Lynda's is worse.


I've been in a bit in a funk since the holidays overwhelmed by the daunting task of cleaning this up. I am - get ready for this- ready to part with some of my long acquired things -sob- sniff- to make room for MORE STUFF! I've been working on my party this weekend trying to come up with new cards and playing with some of my new and old sets and getting my groove back and feeling energized by the excitement of it- although my catalogue has not yet arrived yet!


So here is my Holiday card- I love 3 D and moving cards- I have been following Robert Sabura and his books are my kids favorites- here is his pop ups you can make site:

http://www.robertsabuda.com/popmake/index.asp

I love this stuff and wish they had dies I can use instead of having to cut them out by hand.


Circle cutter - ribbon and pine stamp by SU

the greetings on bottom from PTI


This is the inside: it is a pop up house I made using a book I saw by Robert Sabura- I flipped some things around and changed some windows and door dimensions. The door from Stampendous, Lovely as a tree from SU, and lots of stickles on the wreath, the tree inside the window. I used rolls and rolls of sticky tape to make sure it would hold. The background is memories white paint then stamped with lovely as a tree in artichoke then lots of dazzling diamonds.


This is how it looks from the front. I punched each and every star and circle. the window punch is from creative memories. I was punching each square at a time until I discovered this punch.


This is the detail of the inside- I had picture of the family taken and slipped it inside the door and there is a tree with lots of stickles ornament inside.


Although it was a lot- and I mean A LOT of work- now you know why I've been working on it since March- I sqeal with delight when people open it and are totally surprised.


Hope you like it- I was going to make next year's card really simple but if I can get sizzix to come out with a good sleigh die then maybe .....hmmm... you'll have to wait and see!


Lynda

Thursday, January 8, 2009

Just buzzin by

SU is coming out with its new catalogue in just 10 days- the twice a year highlight of my little quiet life- this is one of the new sets being introduced and I don't know why but I just adore it- love the expressions on the little faces- this is a little quickie I was playing with this morning- nothing elaborate but I thought still sweet- Eastern blooms for the flowers- just buzzing by set on apricot CS stamped in black and bees colored in with apricot markers- hive and little bee in the middle on white CS colored in with watercolor crayons cut out and mounted with dimensionals- a little dazzling diamonds on the wings - again, hard to see those sparkles.


I thought there was a stamp that said HELLO but could not find it in my disaster of a room- still had not had time to reorganize it after the holidays being back at work and all- so I just hand wrote it- as Colleen is always saying when we are trying to buy word stamps- you could write it- so here it is- I think I'd rather use stamps!
Stampin' Up is having a huge blowout inventory sale and they now have the retired accessories list- check it out and you can now place orders on line at my SU website!

Tuesday, January 6, 2009

Hakone Gardens

There is a small but gorgeous Japanese Garden in Saratoga just past the village called Hakone Gardens. It is so authentic that when they were searching for the location to film Memoirs of a Geisha they thought this place ideal and had the whole film crew take over the place- but it really is a beautiful and serene place. In the summers there are red and blue dragonflies and in the winter as it is now there is a certain stillness. There are few flowering plants but there is so much texture.


The bamboo forest is really so lovely with all the linear lines heading toward the heavens. You could do some serious meditatation there.

There is a Koi pond with a little bridge over and in the summers you see a lot of turtles sunning themselves.


There is a modest entrance fee although for kids 4 and under it is free. My kids love running around the hills and exploring the trails that run up and down the hill. Several hours of peace for the grown ups and exhausted kids at the end- they take long naps after - a double treat for me! It certainly is better for all of us both physically and for the soul than a movie and less expensive to boot. Check it out if you're ever in Saratoga, CA.


Monday, January 5, 2009

RAK from Makani

I got this adorable card from my stamping addiction enabler and Amuse guru Makani. I love the images and she used copic to color it in- so cute! I love the little gray shadows under the penguins.


My favorite part was the inside- there was more surprise. I love how she carried the theme to the inside- Images are from Cat's Pajamas-her other favorite stamp company- she just started her own blog here at: http://aloha-makani.blogspot.com/
You go girl! hugs to you too!