Tuesday, February 24, 2009

a little trip to New York City and Hello Kitty

I had to make a trip out to NYC for a medical meeting and you know I can't help seek out the local stamp store. Out of that huge city the only one that stands out is the Inkpad in Greenwich village. It is a tiny- I mean by California standards, REALLY tiny but it has a lot of heart and unique stamps that you can't find in other places.

Here is picture of me with owner Anna.


This is one of the cards I saw there that I had to reproduce so of course I had to have the stencil to make it. Actually I saw this stencil before but I could not find it in any of my local stores....

My little sis Chris lives works in NYC so I had to hop over to her house in Jersey and she has also gotten the stamping bug so we had so much fun playing with all her stuff!

Patrick her computer whiz beau also expanded my blog width so it is not so skinny- THANK YOU PATRICK! Now you will have to wait until I have some time to tweak the title and the rest of the blog.

This card is made with double stick paper and stencil and glitter. If people want to know I can show how it is done.

We also went shopping at AC Moore- we don't have one of these where we live and they had the cutest Sizzix diecuts. Due to limited packing ability- I only brought a tiny carryon!- I only got one but I thought I could use it a bunch of different ways. I also played with Gabrielle, their 5 year old little girl- who is absolutely adorable with a real knack for crafting too!


So here is what we made. It's Hello Kitty Die from Sizzix, with SU cardstock, real red, pretty in pink, white, turquoise, using clear stamp from inkadinkadoo, real red craft ink, black glitter from Martha, and pink flock on the dress. Flower eyelets from memories. Embossing plate on the background from cuttlebug- It is a halloween one but how cute is this with this rocker.....

Love you sis!

Lynda

Monday, February 16, 2009

How to- Clingmounting Stamps 101

I have many stampers who are coming around to the idea of using clingmount to mount their rubber stamps to acrylic blocks instead of permanent mounting to wood blocks. So I thought I would do a 101 on cling mounting.

There are two different widths to the clingmount- the usual is about 1/8 inch thick in gray to the left and thin which is about 1/16 inch thick in black shown on the right. My preference for mounting onto the CD cases is the thin mount for Stampin' Up rubber. They are deeply etched, which is a great quality for stamps but in the CD case the regular clingmount is a tad thick and the rubber will sometimes touch the other side of the case.


Clingmount is a foam with 2 sides- a supersticky side to which you permanently adhere your bare rubberstamp and the otherside you adhere to your acrylic and allows you to cling over and over again. (Should it lose its stickiness, you run it through clean water and it will regain its stickiness)

The clingmount sheet comes in 8 1/2x11 and sometimes 8 1/2x14. They are a bit pricey at about 4 dollars a sheet so I use every nook and cranny squeezing in as many stamps as I can - sometimes I can get as many as 4-5 stampsets per sheet depending on the size of the stamps. Whatever I do not use, I keep the white sheet to keep the supersticky side clean.
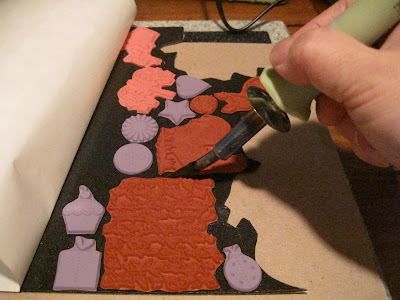
I peel my rubber from the foam mount that it comes with from SU and mount it directly onto the sticky side as shown. Wood mounted stamps need to be removed from the foam mount and cleaned off some before mounting on the supersticky side. Try to label your stamp so you know which company it came from so you can give proper credit if needed.

You can sprinkle baby powder to make the exposed sticky less sticky and used to use a pair of craft scissors to cut it but it gets really gummy and my wrist got tired. so I changed to a hot knife and I tell you.... it cuts like butter!


I would advise that you double check that you have all the stamps for the sets you are cutting and mount them all before you throw out the garbage. I have couple of sets missing one piece. I have turned my stamping area upside down and still cannot find them. I have flushed one down the drain- it was an itsy bitsy heart image then went down the drain as I was washing all my stuff off. BooHoo. At least it didn't block my drain so a call to the plumber was averted, alas.

Now where to store all those stamps?
This is Kompac storage which is about the size of a DVD case. It already comes with a storage sheet but is pricey at about $2.50 a piece. I buy these from Harry at Rubberstamp Concepts in bulk. I buy the thin clingmount from him as well. He offers the best price by mail order if you do it by bulk- so get a bunch of your stamping friends together and do an order.


For CD's I buy the EZ Mount stamp storage panels from Sunday International. The storage sheets are not the nice plastic like the ones Harry sells but is more like a laminated white cardboard but Hey! if it works and is safe for my stamps, I'm OK with it. I had tons of regular CD cases ( thin ones will not work! ) left over after I got my IPod and loaded all my CD's on them, so ask around. There may be other people trying to get rid of them too. I saw that my clingmounted stamps that I placed directly on the CD cases started to make a cloudy etching on the CD case and I am told although it has not happened yet, it can lose its cling. Clear stamps can be directly placed on CD cases without losing its cling.


Sometimes I like to put like stamps together. Cheep Talk and Good friend set just screamed to be put together so I used one large case to put both in.


The large cases also fit my background stamps perfectly as well- the real reason I bought a bunch of these. But I had to snap off little tabs inside - easy to do with bare hands- because the stamp was just a tad too big and then it was perfect.

The storage sheets fit inside the tabs in the standard CD case and I put my clingmounted stamps directly on them.
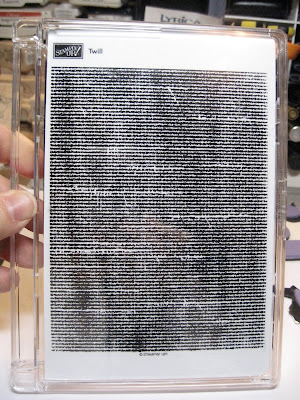
You can StazON images onto the sheet but I usually stamp another piece of paper to index easily from the front and then adhere the clear image from Stampin' Up on the cover so I can see where the stamp belongs when I have it out.


I place the label on the spine and all those cardstock strips left overs from the layering I glue and place behind it to make it easier to see at a glance.
Now you are ready to store your stampsets easily in CD/DVD storage units and mount on acrylic blocks for use with minimum space.
The left over SU plastic containers are used as giftboxes, hold projects, little scraps, etc. The wood blocks are in a big bin at home where my three boys play with them like building blocks. I am always looking for a good home for them, so if you are local and interested, let me know.
Happy Clingmounting!
Lynda


Sunday, February 15, 2009

Just buzzin by with Upsy Daisy


Just a little quickie card- I wanted to use Upsy Daisy as a background. No sure about the color combo but it is a center open with beehive attached to the left and the bee banner attached to the right.


Triangle Treat box

My CTMH buddy Kristina Baldwin showed me a box like this a while back and I JUST LOVE IT! I've making it ever since for little treats and when I saw the Sale-a bration set knew it would be perfect for this application.

It's a really easy project and a workshop wow that anyone can make. Take one piece of cardstock 4 1/2 x 5 1/2- your basic quarter sheet of CS- here is in Sahara sand.

score at 4 1/8", 2 3/4", and 1 3/8" along the long end- basically into quarters as shown.
Cut 2 strips of coordinating designer paper 4"x 1 1/8" - here is darling dots- one of the selections from Sale-a bration- available until end of March only!

Adhere as shown and then stamp the sentiment as shown- here in chocolate chip classic ink pad.


Punch a heart from a strip of coordinating DD paper with the heart to heart punch.

Use dimensional to attach the heart. This is also the good time to stamp your name if you wish. The bottom of this will be the bottom of the treat.


turn the card over. Put w strips of sticky tape as shown - in the middle on the top and on the edge in the rectangle on the other side of your name stamp.

Turn over and attach 4 kisses to the sticky strip that runs through the middle as shown.


This is what it looks like from the front and from the side.

Happy Heart Day!

Lynda

Saturday, February 14, 2009

Valentine Post with mailbox

I found these cute little mailboxes at Target and wanted to make something special for my twins' preschool teachers for Valentines Day.

I have wrapped the box completely in the past because they were plain or base metal but these wer so pretty in their metallic pink, I did not want to cover it up.

so I used a strip of Candy Lane designer paper in the middle and stamped some hearts in StazOn and then heart cut out after stamping on pink pirouette with ridinghood red. I put a little bling where the flag hinges and tied a bunch of different ribbons.

The only issue with these mailboxes is that they are too small for my A2 size cards. Solution? make 3x3 gift cards- they fit perfectly into the box- I got the envelopes at the M store- you know who I mean- in a package of premade cards- I am patiently waiting for Sizzix to come out with a 3x3 envelope die!


So here is what went inside: a set of cards using textured CS with accents by Sweet stems colored in with watercolor crayons and aqua painters and embelllished with little strips of paper and ribbon. The polka dot card is one of the ones that came with the envelopes.

If I had time I would have had everything match the papers outside too. I stamped the little flower in regal rose on the envelope too to match.

How To: Color and Layout help- Websites to checkout

There are several websites I think is helpful to me when I get stuck for ideas:

http://cleanandsimplestamping.blogspot.com/ This is where I go to for really clean and simple card layouts- as their name would suggest. I really gravitate toward this style and you may find it helpful.

http://www.splitcoaststampers.com/ This is a community of stampers that have gotten together to create this wonderful website- there is a gallery with all stampin' up samples categorized by name as well as personal and other company albums (my user name is LyndaLee28 if you want to check out my gallery) and forums with discussions of all things stamps. You can subscribe to this and they will send you emails every Wednesday- I spend WAY TOO MUCH time here......

http://www.stampinup.com/ca/enc/default.asp They have the entire Stampin' Up catalogue and current mini catalogues on line for those of you without one- Mine is vinyl covered to prevent any drool from damaging it! I go to my SU idea book and catalogue everyday for color ideas and layout from their samples- often altering the set that I use and using one color combo with a different layout makes it look totally different.
There are so many others but I think this is my short list. Inspiration is everywhere -in catalogues, websites, stores, even nature. I am always cutting out pictures from magazines and flyers from Target, Gumps, Nordstroms, Gap, Pottery Barn for their interesting and trendy color combos and jotting down things in scrap pieces of paper that I later say- what was this? OH yeah! I wanted to try that...... So look around you.

Lynda

Monday, February 9, 2009

Valentine Exchange Favors- Spellbinder hearts

I got notice- no candy this year- which with the cavity rates is really the way to go. So I made these pencil toppers for my boys to exchange with all their friends.

It was easy to do and we spent a little time this weekend signing their name to each of them.
This is Kyle holding his finished heart. He wanted ot stick the white heart on the red one so some of them are a little off center but still really sweet.


It was really easy to do with the Spellbinders heart dies. After I decided this was what I was going to do I panicked as I did not have the regular heart dies and the other punches I had did not really fit the scallop heart and I really liked this size. But I was able to find it in one of my local stampshops- my last stop of the day on Friday! Cut 2 slits a little less than an inch about 1/2 inch apart for the pencils to slide into and a strip of stickytape to secure to the pencil- otherwise I think the hearts would not stay secure in the hands of preschoolers and second graders.

This is what it should look like from the back with the pencil in- I got these Valentine ones at Target- they have such cute designs on them- frogs, dogs, XOXO etc and pretty cheap. Important when you have to make 50 of these for 3 classes!


This is Kyle signing every one of them nice and neat. Tyler was done in a jiffy and Dylan? well- he struggled a bit- could not make out the name after he wrote it so he ended up stamping his name on the cards and then signing "O." after his name since he can do a circle- kind of anyway.
We're going to have to practice writing a little more with him. Fine motor control is still an issue with him.

So here they are- all fifty signed and ready to go. I stamped the sentiments- Feb 14 from SU and the be my Valentine from a Meyer Francis clear set in red craft ink and then embossed with my scratch and sniff formula with unsweetened cherry Koolaid 1 part to 1 1/2 part clear embossing powder. I added some red fine glitter which I think was a mistake and they seem to want to flake off so I did not tell the kids that they were scratch and sniff - only SNIFF- Tyler said they look like flowers in their buckets- and you know they really do!
Lynda


Friday, February 6, 2009

Honeycomb Fiskars texture plate

I've had some Fiskars texture plates for a long time but had not been very happy with the impression it created so it sat on my shelf collecting dust. But I had just gotten my Stampin' Up texture impressions pad and the texture silicone rubber pad and gave it a try using the instructions on the mutipurpose platform for the sizzix texture plate. It took a little doing- my first try was not very good- the plates are shallower than the sizzix ones and it showed. I gave my mustard cardstock a fine mist of water using my stampin' mist bottle and used the shims and one extra cardstock as a shim and it turned out perfect!


It's just what this stamp needed. The hive and the bees are stamped in black and watercolored with watercolor crayons and aqua painter after black was set, cut out, glittered, and applied with dimenstionals.
This is what it looks like inside.
Again, much cuter and sparklier IRL.
Thanks for looking!
Lynda :-)

Sunday, February 1, 2009


Ilove these series of stamps from American Art Stamp Company- they are so whimsical- this one is called paper hearts-

Pink pirouette base CS with Candy Lane DD paper and ridinghood red striped ribbon. Image in basic black and clothes stamped on the backside of the same Candy Lane DD paper and paper pieced as are the hearts- with a scrap piece of paper and a pair of sharp scissors you can do a lot!

Paper pierce corners.

Happy February and white rabbit!

Lynda