Thursday, October 28, 2010

witch's hat mini reese's candy holder

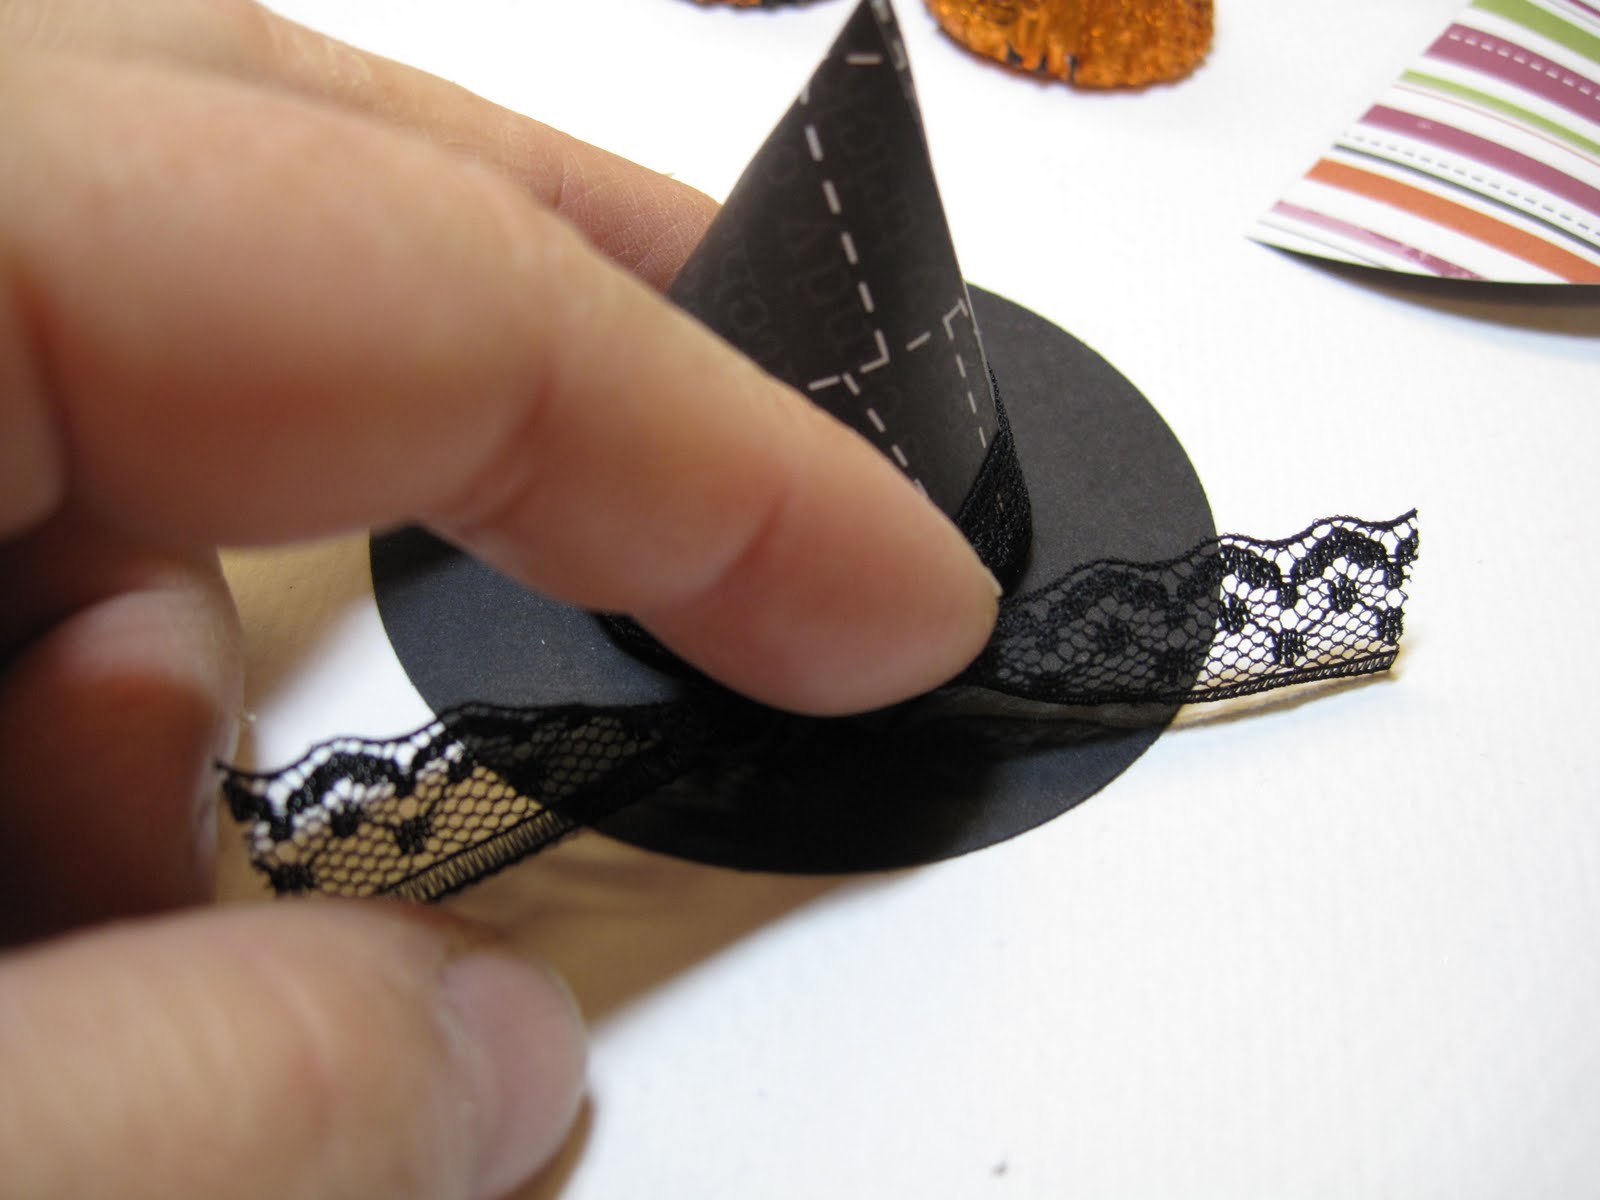
This was one of the projects we made at our last workshop. It is a little witch's hat treat that I cased from Stamping Moon http://www.stampingmoon.com/2010/09/wicked-witch-hat-treats.html.
Take Wicked Fun DSP paper and use circle cutter to cut 3 5/8 inch circle, cut it into half (you get 2 hats out of one circle) and put sticky strip half way up on the straight end.


Put sticky strip pieces into individually wrapped MINI reese's peanut butter cups, stick the straight sideup and down on the candy with the candy and wrap the curved side around the candy and close with the sticky strip side - try to keep the top of the hat pointy.


Take the sticky strip cover off AFTER you wrap the cone and then peel and stick it in case you have to adjust the cone while you are forming it.
(My computer does weird things and I am not sure why my horizontal pictures keep getting loaded up vertically)


Use the dimensionals to attach the reeses to the 2 1/2 inch black circle- cut with either circle #2 die or the new large circle punch.


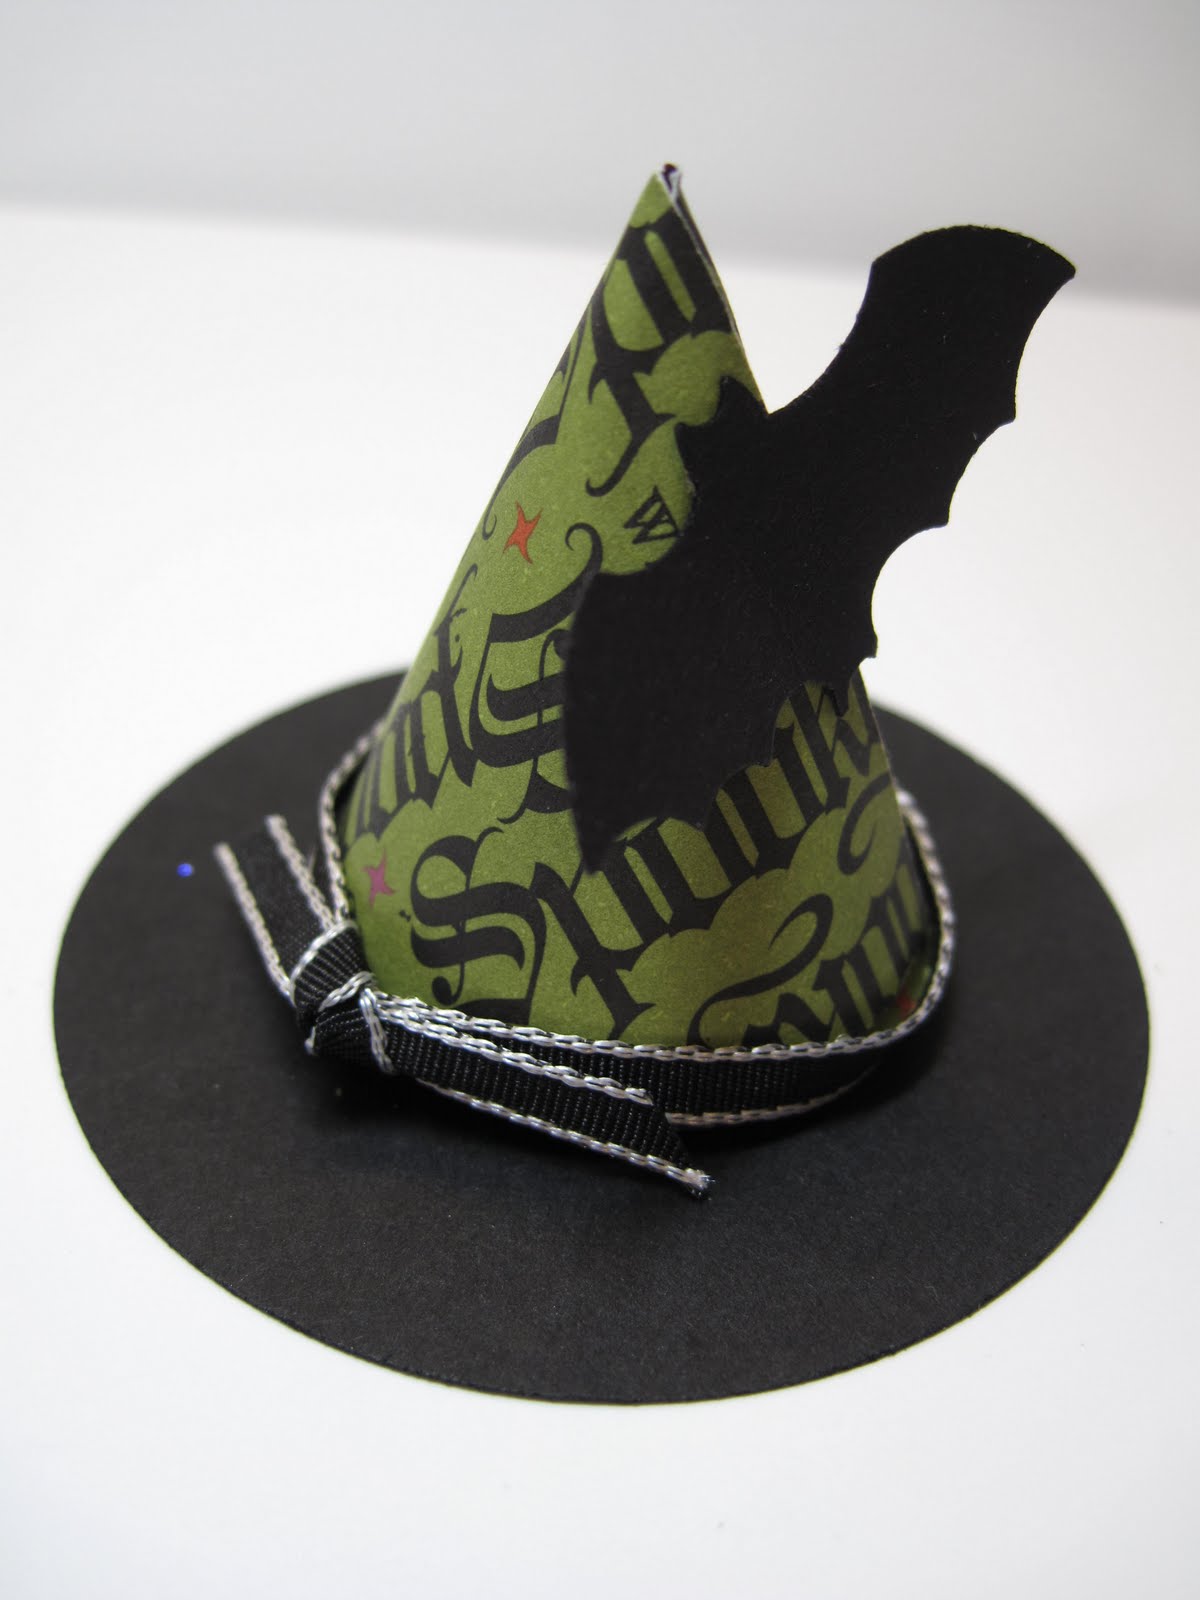
So here is the hat bare completed. You can finish it however you wish.


Here I used the black lace ribbon. It is slippery and hard to keep the ribbon down so I did use a little clear tape to keep the ribbon in place though.


Add bats, flowers, glitter, jewels, whatever you wish to decorate it and have fun.
Happy Halloween
Lynda


Monday, October 25, 2010

a simple christmas card


I am in love with this waffle paper. I wish they would change the name though to something more glam though. I wanted to show you a very simple christmas card you can change up with any accent you wanted.
Here I took a real red basecard. Took a strip of Deck the halls DSP 1/2 inch wide, added a 3/4 inch strip of real red behind it, added sticky strip to the 2 edges in the back and used waffle paper strips to add some pleats. I also used sticky strip to stick the whole thing on to the base card. Remember that there is a shiny and matte side to the waffle paper and use the side you want to show on both sides. I stamped the dec 25 image from tags for christmas set in red craft ink onto crumbcake to sort of match the DSP, then embossed the whole thing with clear embossing powder to make it shine although hard to see here. The whole thing was punched out with the matching decorative label punch- Don't you just LOVE the matching punch thing? The tag was mounted with some dimensionals to make it pop a bit and easy peasy card for a monday. I love these really simple cards. You can add any accent piece where the tag would go, the ornament punch, a large circle, or whatever. I may try some different ones too.
Happy Monday!
Lynda

Thursday, October 21, 2010

belles and boughs variation


The SCS color challenge this week is Concord, cherry and Olive and it looked so Christmas I had to bring my belle and boughs set out and of course the Christmas collage just fit right in.
The Sketch challenge was interesting too. I turned it sideways to make this card.
Base is Cherry, with strips of concord, one embossed with the poinsettia and the other tied with olive ribbon. Added the christmas collage- inked just the bottom and colored it in using watercolor technique using the lids of the inkpad with cherry, olive and daffodil inks. Cut out the circles using coluzzle- remember that? for cutting outside the box for circles or ovals nothing beats that because you can just skip that part as you cut.
Raised the circle using dimensionals and pretty straighr forward card.
Lynda

Sunday, October 17, 2010

Fancy Favor Box easy with no waste!


October is a hectic month in my family. In the last week there had been 5 birthday celebrations, my DH, FIL, my own father and my twins. To top it off there are these superstar things in school where you are supposed to do something special and with going to work, meetings after work, baking cupcakes after meetings after work, getting up early to make favors for the twins birthday party where I think everyone in the class came, I am done for.
But I did want to share with you a little trick for using the fancy favor box. You know I hate waste and to
use the fancy favor box the "right way" I would have to use 12x12 CS and waste a lot of paper- but the real problem was that I did not HAVE any 12x12 enough to make treats for 40 favors. So this is what I did. Take 8 1/2 x 11 CS and cut it longways- so 4 1/4x11 -and lay it on the die (I took a silver sharpie and marked the edges so I knew where it ended) so that the bag flap and the bottom flap are shortened- it should look like the picture on the left after you diecut it.


I then take a piece of matching CS about 2x3 ( I did use a 12x12 for this so that I got 24 pieces out of one sheet). I stuck some sticky tape as shown. (the tape on the box side goes on the side that will be outside of the box by the way.)


I was going to use this specialty Rockability DSP strip (retired that I bought extra just for this occasion) so I used it to guide the areas I wanted to stamp. The sentiment on the back is from a hostess set More the Merrier. The names are made from simple alphabet from PTI.

The boys picked out a pirate cake so I made the thme pirate and used the sword from Pirate time (retired) and embossed it with silver EP. Simple but I thought really cute. The boys gave me thumbs up.


Once I have everything stamped then I put the box together.


First I put the side together. Instead of picking it up and trying to stick it, it aligns better if you just put it down and close the other side down onto it. It will be perfect everytime if you do it this way.

The size of 81/2x 11 allows for just over 1/4 inch overlap perfect for the sticky strip to hold it strong anyway.


This is how it looks closed.


I then put the strip around the center because it does need some extra space for the folds. I find it always easier to glue things on when they are flat. I like to use sticky strip for this as well as it is really secure. I also like a small strip at the end to keep it really securely on.

Start from one edge and wrap it around while you fold the box over and over to accomodate the ends.


Keep going around the edges until you come to the edge and tape it securely so it does not fall off.


This is how it should look when you are done.


Now take the rectangle piece and tape it on . I did fold the shorter ends in first then with the angled cuts on the side on top of that before I attached the bottom unlike the picture.


This is how it looks when you have it attached. I did push it from the inside to make sure it was really stuck. On one of my favors, I stamped the sword in black so that I could pick it as a special one that could win a prize.


I used my crop-a-dile to attach textured black CS 8 1/2 x 3/4 inch strips as handles using some red eyelets.


This is what it looks like from the back. It was not too hard and for less than 1/2 the cost of those store bought cheesy favors I was able to give a personalized gift. I filled it with crayola crayons that I bought at start of school year just for this purpose when it was dirt cheap, crayon erasers, slap stick, pirate stickers, and a little candy treat for the kids ( I know it is bad for you but what birthday favor is complete without something that is bad for you but still yummy!)

Now to have these kids write thank you cards for all the things they received from their friends....sigh. I have to go make 40 thank you cards.... The things we do to teach our kids good manners! I do think it is worth it. You just have to start young so that they think there is no other options.
Lynda


Monday, October 11, 2010

Day of Gratitude with library clip


This is a case from a stampin up regional in Baltimore- I loved the idea of cutting up a piece of paper to make sections. The base is Cajun craze stamped with the large flower element in same color. I punched 3 tiny holes in the basecard to hide behind the crumbcake piece and strung the linen thread 3 times to make a connecting element and knotted it.


This is what the back looked like.

I cut the very vanilla CS to offset a little then stamped the images from Day of Gratitude set in crumbcake(leaf), olive (sentiment) and crumbcake then used expresso marker to make the acorn, and the flower is old olive and cajun craze markers. I pierced some of the pieces on the edges, and elevated all the pieces with dimensionals and fit the little library clip. Put the whole thing on the crumbcake piece and it was actually a clean and simple card style that I really like. I hope you do too.
Lynda

Saturday, October 9, 2010

Bells and Boughs with gold waffle paper


This is a case from Iliana Crouse. I had this for my workshop and it was darling. I am planning on doing this for my demonstrator swap later this week. Looks hard- but NOT. It did take a while to color everything in. Base card is real red.
The whisper white was stamped with christmas collage with black Stazon then colored in with red, artichoke, garden green and old olive watercolor crayons using the aqua painter.
I added a piece of garden gren to balance the card because the christmas collage in this direction did not go all the way across the card.


The accent piece is a shimmer paper circle then I tacked a whole bunch of tape behind and put gold waffle paper strip around it. In this one I cut out another piece of white, stamped the bells and colored it in with watercolor crayons again but it was so much work so that I will make it in the future with the bells just stamped onto the shimmer paper circle itself. It looks just as pretty.

I edged the white piece with another strip of gold waffle paper. The transition looked a little funny so I ran a piece of 1/8 inch taffeta but that looked lonely too. I took a bow made on its own and stuck it on the side with a glue dot and it made it look more complete. (and I alos like that my ribbon is not twisted - the way it would be if I tied the ribbon on the card itself.
See? looks hard but not really.
Love that big collage stamp. I'll work on more variations of the stamp as we draw near Christmas.
Lynda

I'm BA-ACK!


I now physically feeling the pressure from the last few months finally lift from me. The old office is completely closed- I turned in my key after spending 2 weekends from dawn to dusk, started at the new work- and the people have been super supportive, and my computer system maybe up and coming soon.
My parents flew in from Florida to watch my kids- which I really appreciate.
Life is Good.
And despite it all I wanted to make sure I held my monthly workshop for my loyal friends and customers. Stamping keeps me sane and a vital part of my mental health care. This is something I came up with to show faux letterpress technique although it was a bit messy. Base is basic black. I took the spider embossing folder and used the versamark to LIGHTLY ink the raised portion of the spider web. Embossed the paper, then into the impressed area I sprinkled some silver embossing powder, brushing off any excess.( you could use the brayer but do not press too hard or you will get a lot of silver on the non-web areas as well- although with the things on top it matters little.) (You could emboss with the folder, then wipe the versamark pad over the raised area then use the EP as a variation of this as well)
I punched an owl and a bat in basic grey, cut the bat in half and stuck the wings on the back to make the bat owl.
I started out with intention to make EEK but the letters were too big to fit. The BOO using all caps did not fit either. So I diecut the letter B from serif essentials, then took 1 1/4 inch circles and they fit the space better especially with the bat on top. I liked 3/4x15/16 oval punch from the holiday mini so I used that to punch the center of the circles- but it is much easier if you punch the small ovals first before you punch it out with the 1 1/4 circle punch.
Added a white circle from the itty bitty shape punch for the eyeballs and a fun little halloween card!
I sincerely appreciate all your encouraging words and support during these trying times.
Thank you all!
Lynda

Tuesday, October 5, 2010


This has been a life changing month for me. I closed my office of 17 years, had my partner retire, and started a new job. My youngest twins started kindergarten and with them in school most of the days I let my nanny of 9 years go too. She was more than a nanny, with me working all those hours she was their surrogate mom. I know for one of my twins, who was really attached to her, this si going to be really traumatic.
This is the card I made for her to say what I could not say in words. She has alway liked my flower cards so I hoped she would like this.
It is a big card 8 1/2 x 5 1/2 - half sheet not quarter like I normally make. The base is whisper white with a large pear pizazz sheet that I embossed twice with the elegant lines embossing folder.
There were some extra lines that got impressed using the folder twice but
I tried to put the center panel to hide most of the unsightly lines behind it so it worked out fine. I added the pumpkin and the daffodil 1/8 ribbon and used a corduroy button to anchor it but it was too plain so I added a flower brad- cut off the legs and glued it on and added a small pearl in the center and it was kind of pretty.
I also added some extra pearls here and there to add some sparkle on the embossed area where the circles fell.

The flowers are larkspur from the year of flower series from PTI, colored in cop*cs. I stamped extra pieces so I can color and pop them out. as you see here


The sentiment is from spiral bouquet stamped in black and I added a tiny pearl where the i was dotted- it was perfect size!
The whole family and the kids signed it on the inside with a special sentiment. I hope she liked it.
Lynda

Friday, October 1, 2010

Enjoy Every Moment October Blog Tour


Welcome to the enjoy every moment october blog hop! I hope you have been having fun visiting all my fun and talented friends who have put this together for you. I myself have been thinking of some holiday ideas to use for the owls and these are 2 little ideas I wanted to show you.
The base is real red with bashful blue DSP in polka dot that I thought resembled snowfall. Whisper white was torn to make it look more snow like. Put a little glitter with glue and the back ground is ready to go. The sentiment is rough type from the summer mini. The owl body is chocolate, with hat and scarf from a retired SU DSP.

The songbook is from the First day set also from the summer mini that I cut out and stamped with the holly from the new holiday mini tag set in green. I put a little gold on the spine to make it look more booklike. I cut out another one in white and layered in underneath to look like pages in a book.
Pretty easy owl card- I thought it would be fun to put maybe 3 owls standing underneath a lamppost or a tree- I will have to try that next time.


This is another one that was swimming in my head for a while. I thought a reindeer wannabe owl- Used the snowflake punch to make the antlers and the circle from the new designer DSP to make the nose. the body was punched in crumbcake and scallops stamped from PTI background retro set. the branch was die cut with bird and branch sizzlet strip in olive that I ran the soft suede pad to paper direct technique. Added some liquid applique in white and glitter. The back ground was airbrushed in B32 Cop*c with a circle masking the moon.


Wandering words set for the santas sleigh ride separated from the words.

A little liquid applique, glue and glitter and voila! another not too difficult card!
don't you just love owls?


The sentiment is a partially inked stampset from saleabration earlier this year.
A little bling to make it a little special and it is a cute card. We can all dream!
Now get going to the my wonderfully talented friend Mercedes here: http://mercedesweber.blogspot.com/

Sorry folks I just could not get that next blog icon to work by just clicking- I'll try better next time!
Lynda